Tampilkan postingan dengan label How To. Tampilkan semua postingan

Jumat, 14 Februari 2014

Add Facebook Like/Fan Box To Blogger Blog Easily

2. Get your Facebook page id URL by Visiting your Facebook fan page.
3. and paste your fan page url in Facebook Page url box like screen shoot below.
4. Set other parameters such as width, height and stream. The Preview on the right will update itself as you enter the changes. 
5. Click Get Code button when done. You’ll be given two codes, titled iframe andXFBML. You only need the iframe code.
The Iframe Code Should Look Like This . 

6. Copy the code (the code provided by Facebook, not the sample code in no.5). 
7. In Blogger Dashborad, go to Layout and click a Add-A-Gadget link. SelectHTML/Javascript gadget and paste the code in the content box. Save and view your blog. For Further Help See Video Tutorial. Enjoy!
Adding this widget is surely easy but still if you encountered any troubles just post your query below in comment box and I would love to reply back as soon as time allow thanks for reading our post. happy blogging.

Kamis, 13 Februari 2014

Cara Memasang Banner di Blogspot Version 1

     Cara memasang banner di blog pastinya sudah banyak tutorialnya kalau di cari di google ya. Tapi aku mau mencoba menuliskan kembali siapa tahu berguna untuk teman-teman yang sedang membutuhkan.   Pemasangan banner di sidebar blog kadang dibutuhkan, contohnya untuk mengikuti suatu kontes atau pemasangan iklan.

Biasanya kode html untuk pemasangan banner sudah disediakan oleh penyelenggara. Pemilik blog tinggal copy paste kode tersebut ke sidebar blog masing-masing. Untuk sidebar yang lebih kecil mungkin saja ukuran bannernya terlalu besar sehingga harus diedit terlebih dahulu. Disini aku akan memberikan cara mudah memasang banner di blogspot tanpa harus mengcopy paste kode yang sudah disediakan.

1. Save as gambar atau banner yang dibutuhkan ke komputer.
2. Create New Post, seperti akan membuat postingan baru
3. Insert image. Caranya seperti akan mengupload gambar ketika kita akan membuat postingan.Gambar Yg DI Uploud Adalah Gambar Yg Sudah Kita Buat sendiri atau Dari Internet.

4. Setelah gambar dipilih maka akan terlihat gambar yang kita inginkan di halaman postingan.
5. Atur gambar sesuai keinginan. Misalnya ditempatkan ditengah. Ukuran gambar small.
6. Bila nantinya gambar akan mengarah ke link suatu blog, maka klik gambar dan tambahkan link tujuan.
7. Copy kode pada tab HTML
8. Kembali ke  dashboard, pada tab layout pilih add gadget. Pilih HTML/Javascript
9. Masukkan kode html tadi pada content lalu save. Maka banner sudah terpasang pada sidebar blog kita.


Selesei Deh Tutorial Membuat Banner nya :)  Semoga Sukses !!!

Kalo masih Gak Bisa/ Bingung ama cara yang satu ini, kalian bisa Klik Disini untuk Jalan Yang lainnya ^_^


Jumat, 17 Januari 2014

Make Your Computer Talk !

Yeah its a really big story behind this hack,
I was just wandering here and there on the net,
and then something tickled in my head that, How cool it would it would be
if i have my box talking and telling me stats of the computer just for fun
It would also produce that hacker felling in to and would be so cool to Show OFF !!

After few rounds of Mine on internet on searching on Google i couldn't
Find on it but then i thought to code it because there was no choice left for me 
So i just picked my laptop and got with VBS.
Its really cool to code on vbs because its really simple and easy,
So i just went on with it
and produces this little hope you all like its :)

Just Follow these Simple Steps :-

1. Open Notepad.
2. Copy the following code and paste in the notepad.


Do
Dim msg, sapi
msg="8ahiaushdiuhasd7w2uh7kahsudha Is the Code For you Hacker next is 7aygsdyagd7aw7dgiauw6twr2jsddd There is good code Hacker e812ge8"
Set sapi=CreateObject("sapi.spvoice")
sapi.Speak msg
loop
 talk
3. Save it as Talker.vbs. 
4. Then RUN it.
5. And WOOOOSH…………!!!!!
6. The Computer starting to talk by it self.
7. You can also edit it if you want to talk anything else ;)
    For that just Edit the content of   msg=" # " In second line of this code.
8. If you wan to stop it,its really simple just Follow the steps :-
    a. Hit CTRL +  ALT  + DEL  >> that will open the task manager.
    b. Choose Processes TAB   >> to view the running processes.talk
    c. Find wbscript.exe in the list,Select it and the Hit End Process Button.
9. And then Enjoy !!

Some think you would like to know to grow your knowledge !!

Speech Application Programming Interface (SAPI) is an audio interface that was developed to use within Windows operating systems, the idea behind SAPI was to make possible the use of speech synthesis and recognition within the function of various Windows applications

Its really cool to SHOW OFF in front of others,
as to show them that you are a great hacker
a screen saver of matrix would be like a desert on it !!!
Download
Its really a small hack i use to in my free time.
Just wanted to share with you Guys !!

Well Happy Hacking !! 

Impress Your Friends With Invisible Folders !!

There have been many questions on how we actually hide a folder in windows Xp box.hack friends
well its not that tuff if you have brain with some computer :) 
This technique is my old school way i have used many  times in need !
Look there is no point in creating hidden folders 
because you can just go to -

Tools > View >
Show hidden files and folders
But there are many other ways by which you can easily trick your friend or even foe !
just follow these really simple steps and make your friend go ZOOM !!!

Follow these steps: 

1. Right click in a directory and go to New Folder. 

2. Right click and then go to rename. 

3. Delete the name and press Alt + 255. This will make the text disappear. 
   NOTE : Please use the Numpad of you computer for pressing Alt + 255 or else it will not work !!


efefewwef


4. Right click on the folder once again but this time go to properties. Click on the"Customize" tab and go to the bottom where it says "Change Icon".

5. Scroll over and choose a blank icon like in this picture  : 

hack friend

One Minor flaw is that when you highlight the area with the folder, a small rectangle shows, indicating something is there. Also if you change the view to "Details" it will show it in Description. 

This is great for hiding folders because if the even if the person highlights the area, they would have to know it was there.

------------*-------------------------*-------------------------*----------------------*----------------

Hope You all get it !!
if any problem comes please don't forget to comment below . So we can go rocking !!

Please don't forget to subscribe to get these hacks straight in your inbox !!
Happy Hacking !!
 

Selasa, 07 Januari 2014

Cara mengubah powerpoint dll. menjadi format PDF

       Portable Document Format atau sering di sebut PDF adalah format file yang sering kita dengar. misalnya saja e-book, hampir semuanya memakai format ini. PDF dipilih karena salah satu kemampuannya yang dapat di buka dalam berbagai gadget misalnya PC, iphone, mobile phone, dsb. selain itu file PDF juga bisa langsung terlihat di browser saat anda mengakses direct link file ini dari suatu website.

       Walaupun harus mengorbankan keindahan animasi yang anda buat, pengkonversian file powerpoint anda ke format PDF ini kami rasa cukup efektif. terutama untuk anda yang ingin membuat modul / e-book.
Lalu bagaimana cara mengubahnya? untuk powerpoint 2010 anda bisa langsung menyimpan powerpoint ke format PDF di dalam menu save as.

ScreenHunter 01 Oct. 04 17.061 Cara mengubah powerpoint menjadi format PDF  Sayangnya untuk powerpoint 2007 fitur ini tidak langsung ada, tapi tidak usah khawatir, silakan download 2007 Microsoft Office Add-in: Microsoft Save as PDF di sini . Dan perlu anda ketahui fitur ini bekerja di seluruh office (tidak hanya powerpoint).
Bagaimana? tertarik memakai format PDF? Semoga bermanfaat.

Selasa, 08 Oktober 2013

How to Make a permanent, reusable glow stick


Make a reusable glow stick, glow-in-the-dark-style! Imagine, you'll never have to buy one of those ChemLite's again, because you can reuse this homemade glow stick over and over again. This video tutorial will show you how to make a permanent, reusable glow stick. The materials in this experiment are simple: epoxy resin, straw, and some phosphor powder.
C For Chemistry delves into the chemistry of science experiments. This chemist knows what he's talking about. These chemistry experiments are not only fun, but very educational for all of those interested in scientific chemical reactions and properties.
HOW TO:
1. Ready the epoxy resin.
2. Copper doped zinc sulfide is added to syringe.
3. Add an equal amount of epoxy resin to the syringe.
4. Stir with a glass rod.
5. Inject mixture into tube (straw).
6. Leave syringe and tube undisturbed until completely hardened.
CHEMISTRY OF IT:
Phosphor powder carries property of phosphorescence, which is a specific type of photoluminescence related to fluorescence. Don't confuse this with chemiluminescence used in commercial glow stick, which depends on energy of chemical reactions.
Check out more of C for Chemistry science videos on WonderHowTo.

Music: Funkorama by Kevin MacLeod @ Incompetech
Licensed under Creative Commons "Attribution 3.0"

Sabtu, 05 Oktober 2013

Cara Mudah Memasang Musik Di Blog Menggunakan SCM Music Player


Sekarang saya ingin berbagi tentang cara memasang lagu di blog kesayangan kita. Mungkin teman-teman pernah berkunjung ke sebuah blog/situs, terus mendengar lantunan lagu yang enak banget didengar. Pemilik blog tersebut sengaja memasang lagu di blog agar pembaca semakin betah berlama-lama di blognya. (Untuk Vidio Ada Di bawah gan ) 

Banyak penyedia layanan Music Player untuk blog dengan berbagai macam model dan bentuk. Dan kali ini saya akan coba Share Widget Musik Player yang bentuknya toolbar yang bisa kita pasang diatas maupun dibawah blog. Kita akan menggunakan jasa gratis dari SCM Music Player.

Berikut cara pemasanganya :

Sebelum melakukan pemasangan kujungi dulu situsnya http://scmplayer.net/

  • Pertama Choose Skin. Disini kita bisa memilih Toolbar Skin yang akan kita pasang nantinya di blog atau kita bisa menggunakan Custom Skin CSS. Sebagai contoh disini saya akan menggunakan Skin yang berwarna Biru, seperti gambar dibawah ini :
  • Selanjutnya berlanjut pada Edit Playlist. Pada tahap ini kita bisa menyusun Playlist lagu secara manual dengan memasukkan judul dan link lagu yang bisa kita dapatkan di youtube, 4shared atau dari  web penyedia musik lainnya.
  • langkah Configure Settings, setting sesuai keinginan kita, Auto Start/Tidak, Shuffle Playback'a, Volume'a, Toolbar'a diatas/dibawah. dan klik done
  • Pada langkah terakhir anda akan melihat kode HTML seperti pada gambar berikut. silahkan Copy dan paste pada HTML/JavaScript yang terdapat di Blog anda. 

Selesai.
Mungkin Belum Jelas ?? Ane kasih Vidionya ,,, :
Nontonya Di Youtube Biar Pas,, hehehe

http://www.youtube.com/watch?v=1l6FiObLmbg

How To Control Your Mouse Pointer With Body Movements


Now Control Your Mouse Pointer With Body Movements


  1. Download Camera Mouse software [HERE] Size: 12.1 MB
  2. Now you will get a .exe setup, double click it.
  3. Now just follow steps and install this software on your Laptop/Desktop.
  4. Now you will get a green rectangle icon on your Machine,
  5. double click it and you will have this tool running.
  6. Now you will see your webcam running and your face would be visible.
  7. Now just use your mouse to click on any part of your face or body to track.
  8. Now a green rectangle would be marked on that place.
  9. Now it will start moving as you move and now you will see your mouse moving as your part move’s that’s it.
  10. Now you can easily click on any part and enjoy mouse movement with gesture’s.
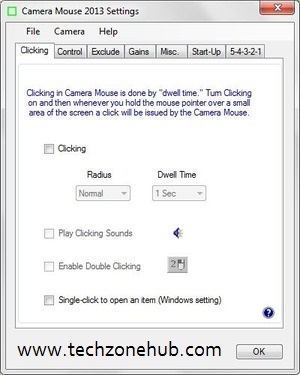
  11. Now to use click’s just setting open sett and under clicking Tick mark.
  12. Now choose settings and when ever you want a click just wait for that seconds and mouse will automatically click on that place.

How To Post Animated Pictures On Facebook


Now You Can Post The Animated Pictures On Facebook
Easily


Facebook doesn't allow users to upload animated GIFs anywhere on the site, so if you wanted to have an animated GIF somewhere, you’re out of luck, unless…
There is a trick that allows anyone, who has the following resources, to bypass this limitation in uploading animated GIFs for custom tabs.

Follow The Steps:-

1) You must have Adobe Photoshop C5 & Quicktime Player.

2) Select the animate GIF you want to upload.

3) Open Adobe Photoshop CS5 and go to File > Import > Video frames to layers. In the File Name box, 

    just enter *.* as your filename and choose your GIF image.

4) Resize your GIF to 111 x 74 pixels to fit the custom tab image .

5) Save your file in a PSD format. Check the save option, ‘LAYERS’ and upload it..

How to make a simple powerpoint game ?


Now You Can Make a Simple PowerPoint Games

1. Open Microsoft PowerPoint.

2. Create a new, blank presentation by pressing Ctrl-N.

3. Make sure the first slide's layout is the title slide .

4. In the title box, name your new game . In the title box, name your new game.

5. In the subtitle box, write "Click Here" .

6. Create a new slide, one with a title and text, by clicking Insert->New Slide.
Create a new slide, one with a title and text, by clicking Insert->New Slide .

7. Highlight "Click Here" and link it to slide 2 by selecting it then right click and go to hyperlink .
8. A box will pop up.
You pick Place in This Document, pick slide titles, then slide 2.
9. Create a scenario for this slide and create options to deal with the scenario.
Create a scenario for this slide and create options to deal with the scenario .

For example, slide 2 would look like: You are lost in a desert,
do you: Look for water.
Build a sand castle.
Shoot a camel.
Do nothing.

10. Highlight each option and link them to another slide that presents a new scenario .
This new scenario will present the player with the consequences of his/her actions.
There will be wrong choices and there will be right choices.
11. Continue the chain of linked slides until a final result is  arrived .
Enough wrongchoices will lead to a slide that reads something like
'You Lose' and enough right choices will lead to a slide that says something like
"Congratulations you win!